What Are the Essential Tips for a First-Time Rooftop Tent Trip?
Worried your first rooftop tent trip will be a disaster? You have the gear but fear a steep learning curve. Don’t let uncertainty spoil your adventure before it even starts.
Practice setting up your tent at home first. Pack essential gear but travel light. Plan your route and meals ahead of time. Driving and campsite selection are different with a rooftop tent, so proper preparation is everything for a smooth and enjoyable first trip.
I remember my first time out with my new rooftop tent. I was a mix of excitement and nerves. But I quickly learned that a successful trip comes down to what you do before you go, how you handle the drive, and how you set up camp. Let’s break down the journey into these three key stages to make sure your first adventure is a huge success.
What Should You Do Before You Go?
Overwhelmed by packing lists and setup videos? The pre-trip phase can feel like a massive task. Don’t let the small details stop you from getting out and exploring.
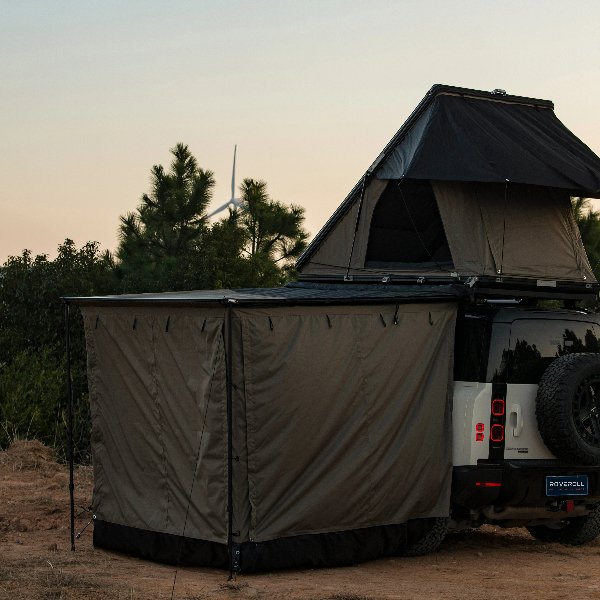
Your most important pre-trip task is a trial run. Set up and take down your tent in your driveway. This builds muscle memory and confirms all parts are working. Also, create a simple checklist for essentials and pack smart to manage weight and space.
Preparation is the foundation of a great trip. When I first got my tent, I blocked out an afternoon to do a full-scale rehearsal in my driveway. It was the best decision I made. This initial practice run helps you get a feel for the process without the pressure of a dark or rainy campsite. You learn how each latch works, how the ladder extends, and the best way to fold the canvas. That first time took me nearly an hour. Now, I can do it in under ten minutes.
The All-Important Trial Run
The trial run is more than just a practice setup. It’s your chance to check your equipment thoroughly. Climb inside and test the mattress. See where you want to store your bedding. I always recommend leaving your sleeping bags and pillows inside the tent when you pack it up. It saves a huge amount of space inside your vehicle and makes setting up for the night much faster. This is also the time to make sure your tent is mounted securely to your roof rack and that all bolts are tight.
Smart Packing and Meal Planning
Packing for a rooftop tent trip is a balancing act. You need to be prepared, but you also need to manage your vehicle’s weight. Create a checklist that separates needs from wants. Essentials always include lighting, cooking gear, and appropriate clothing. For food, simple is better on your first trip. Plan easy one-pot meals or things you can cook over a fire. Pre-chopping vegetables and marinating meat at home saves a lot of time and mess at the campsite.
| Category | Must-Have Items | Nice-to-Have Items |
|---|---|---|
| Sleeping | Sleeping bags, pillows, headlamps | Small battery-powered fan, extra blanket |
| Cooking | Stove, fuel, pot, pan, utensils, cooler | French press, spice kit, camp table |
| Safety | First-aid kit, fire extinguisher, GPS device | Bear spray (if applicable), multi-tool |
| Comfort | Camp chairs, appropriate clothing layers | Portable shower, awning for shade |
How Does Driving Change On the Road?
Concerned about how the extra weight on your roof will affect your driving? It’s a common fear for new owners. A top-heavy vehicle can feel unstable and definitely changes how your car handles.
Drive slower than you normally would, especially on highways and around corners. The added weight and height change your vehicle’s center of gravity. Be constantly mindful of your new height for overhead clearances like garages, drive-thrus, and low-hanging tree branches.
Driving with about 150 pounds or more on your roof is a totally new experience. I learned this the hard way on my first highway drive when a strong gust of wind pushed my truck more than I expected. The added weight and altered aerodynamics mean you need to be a more conscious driver. Your vehicle’s center of gravity is higher, which means it will lean more in turns. Take corners and exit ramps slower than you usually would. Also, your braking distance will increase, so leave more space between you and the car in front of you.
Height and Clearance Awareness
Your vehicle is now taller. This sounds obvious, but it’s easy to forget when you pull into a familiar parking garage or fast-food drive-thru. Before you leave, measure the total height of your vehicle with the tent on top. Write it down and stick it on your dashboard as a constant reminder. When you’re driving on trails, this is equally important. What used to be a clear path might now have low-hanging branches that can snag and damage your tent’s cover or shell.
Fuel Economy and Wind
You should also expect your fuel economy to take a hit. The added weight and wind resistance mean your engine has to work harder. There’s no way around it, but driving at a steady, moderate speed can help minimize the impact.
| Driving Factor | Without RTT | With RTT | Key Adjustment |
|---|---|---|---|
| Center of Gravity | Low | High | Reduce speed in corners and turns. |
| Braking Distance | Normal | Increased | Increase following distance. |
| Vehicle Height | Standard | Increased | Know your new height; avoid low clearances. |
| Fuel Economy | Baseline | Reduced by 10-15% | Drive smoothly; avoid rapid acceleration. |
| Crosswind Effect | Minimal | Significant | Keep both hands on the wheel; anticipate gusts. |
What’s the Best Way to Set Up At the Campsite?
You’ve made it to camp, but where should you park? The perfect spot for a ground tent isn’t always right for a rooftop tent. Finding a good spot is about more than just a nice view.
Find the most level ground possible to park your vehicle. This is crucial for a comfortable night’s sleep. If you can’t find a perfectly flat spot, position your vehicle so your head will be higher than your feet when you sleep.
Getting your vehicle level is the most important part of campsite setup. I carry leveling blocks for this exact reason. Even a slight slope can make you feel like you’re rolling out of bed all night. A simple bubble level app on your phone can be a huge help. Once you’re parked, put on your parking brake and consider chocking your wheels for extra security, especially if you’re on any kind of incline. After that, setting up the tent should be easy, thanks to the practice run you did at home.
Comfort and Ventilation
Once the tent is open, focus on comfort. Adjust your ladder to the correct angle; it should be stable and not too steep. Inside, organize your sleeping gear. Open the windows and vents to manage airflow. Condensation can build up inside a tent overnight from your breathing, even in cold weather. Cracking a few windows allows that moist air to escape, keeping your sleeping bags dry and you much more comfortable. Having good ventilation is a game-changer.
Site Awareness and Safety
Think about your surroundings. Try to park so your tent door is sheltered from the prevailing wind. Also, be aware of what’s above you. Avoid parking directly under dead branches, which are sometimes called "widowmakers" for a good reason. And remember, you’re sleeping on top of your car. Always keep your keys in the same spot, either in the tent or your pocket, so you can sound the alarm if needed and won’t get locked out in the middle of the night.
Conclusion
Preparation is the key to a great first trip. Practice at home, drive carefully, and set up your campsite for comfort. Now get out there and start your adventure.